> ## Documentation Index
> Fetch the complete documentation index at: https://docs.autocalls.ai/llms.txt
> Use this file to discover all available pages before exploring further.
# Zadarma Integration
> A step by step guide to connect your Zadarma phone numbers via SIP trunking
This guide walks you through connecting your Zadarma phone numbers using SIP trunking. Zadarma offers two connection types — **PBX** and **SIP Direct** — and the setup differs slightly for each.
**Which type do you have?** If you use Zadarma's virtual PBX with extensions (e.g., 100, 101), you have **PBX**. If you use a standalone SIP account without a PBX, you have **SIP Direct**.
Select your connection type below and follow the steps:
## Step 1: Gather Your SIP Credentials
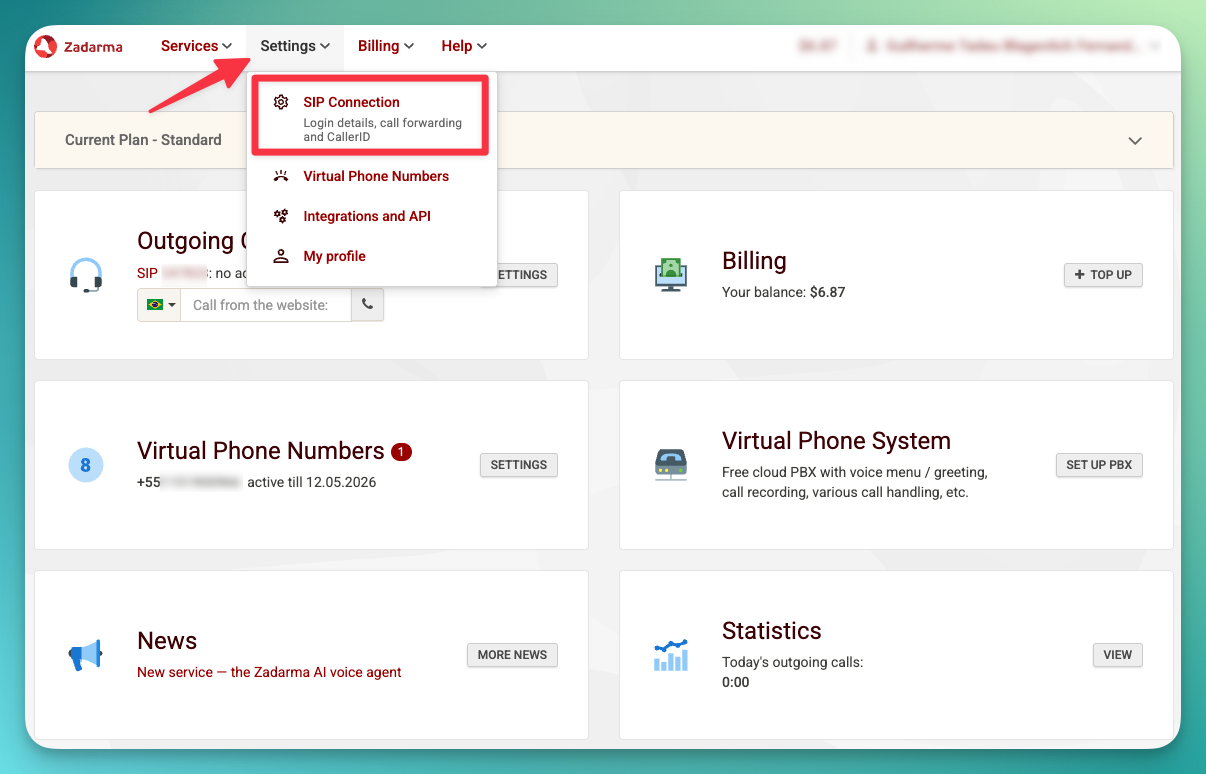
1. Log in to your [Zadarma Dashboard](https://my.zadarma.com)
2. Go to **My PBX** → **Extensions**
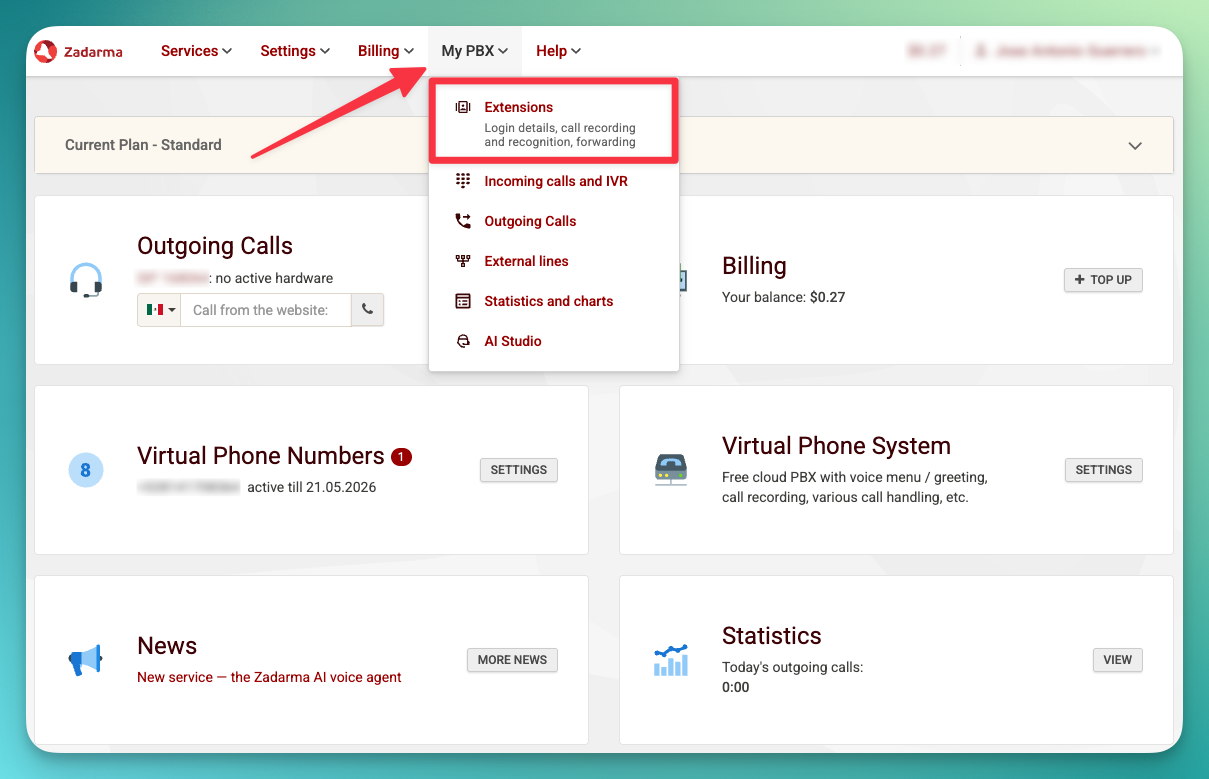 3. Find your extension and note these details:
```
Extension: e.g., 510000-100
Server address: pbx.zadarma.com
Username: Your extension username (e.g., 510000-100)
Password: Your extension password
Phone number: Your phone number (e.g., +521151900966)
```
3. Find your extension and note these details:
```
Extension: e.g., 510000-100
Server address: pbx.zadarma.com
Username: Your extension username (e.g., 510000-100)
Password: Your extension password
Phone number: Your phone number (e.g., +521151900966)
```
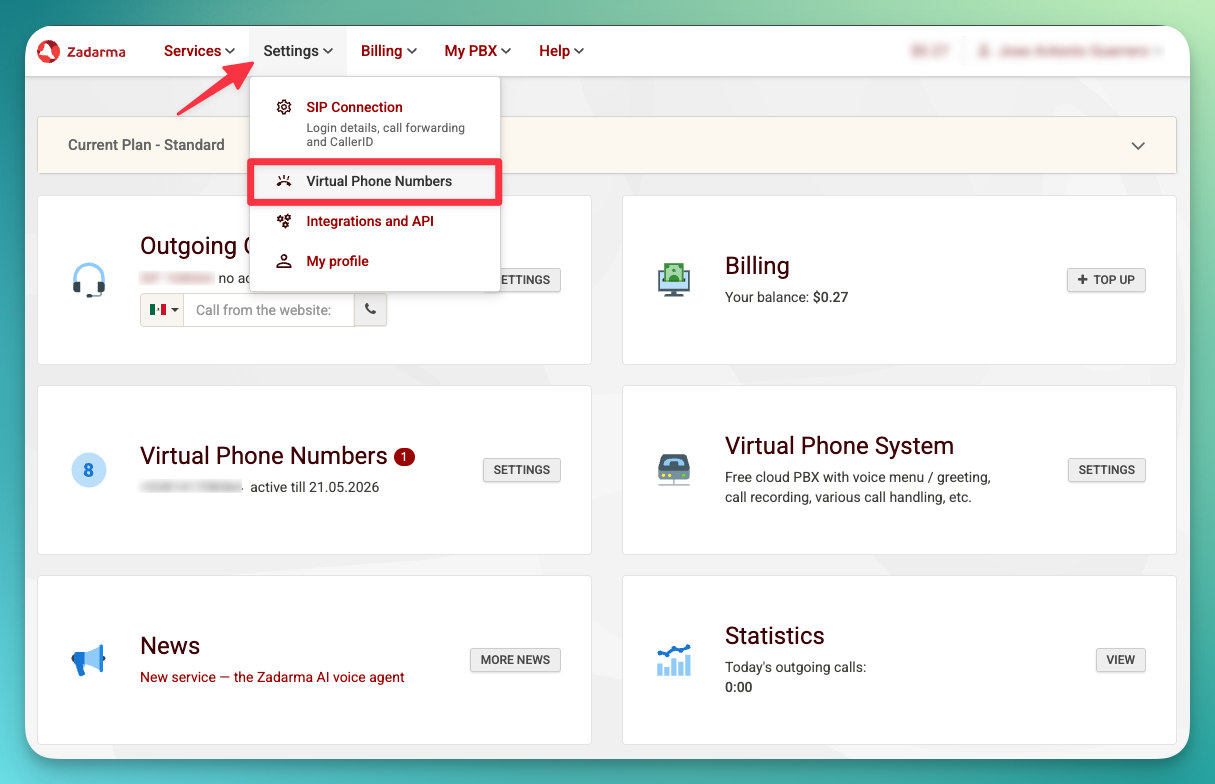
 ## Step 2: Set Up External Server (for inbound calls)
To receive inbound calls, you need to configure an **External Server** in Zadarma that forwards incoming calls to the platform's SIP server.
1. In your [Zadarma Dashboard](https://my.zadarma.com), go to **Settings** → [**Virtual phone numbers**](https://my.zadarma.com/dirnum/active/)
## Step 2: Set Up External Server (for inbound calls)
To receive inbound calls, you need to configure an **External Server** in Zadarma that forwards incoming calls to the platform's SIP server.
1. In your [Zadarma Dashboard](https://my.zadarma.com), go to **Settings** → [**Virtual phone numbers**](https://my.zadarma.com/dirnum/active/)
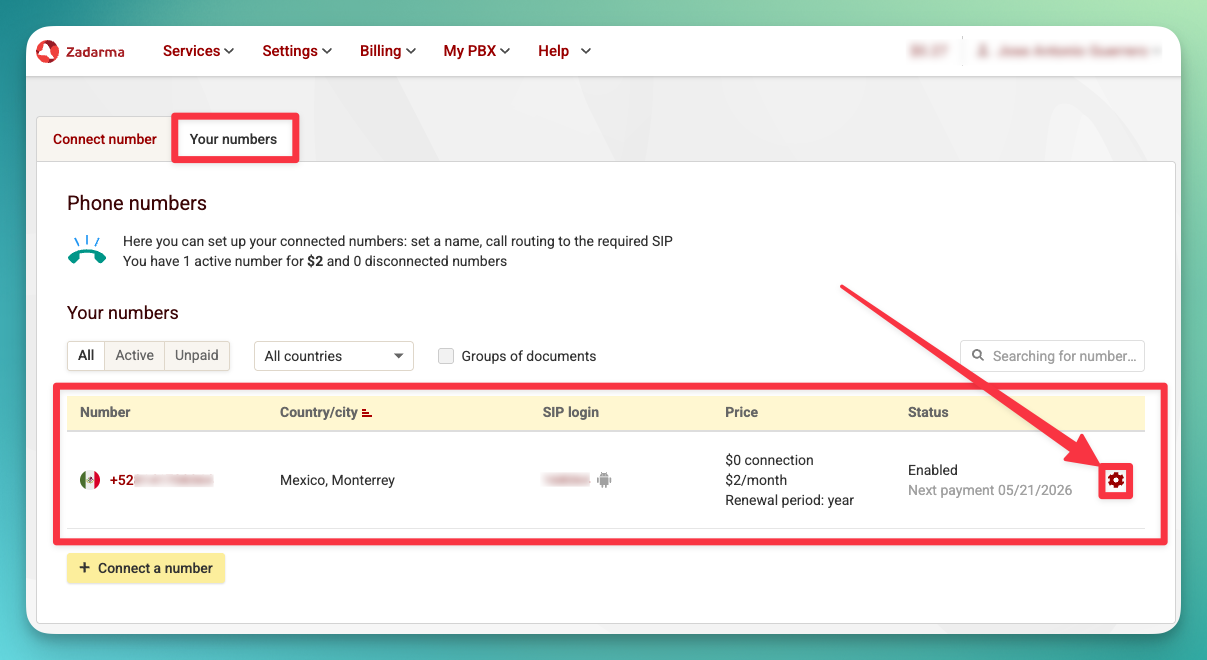
 2. Find the number you want to connect and click the **gear icon** to open its settings
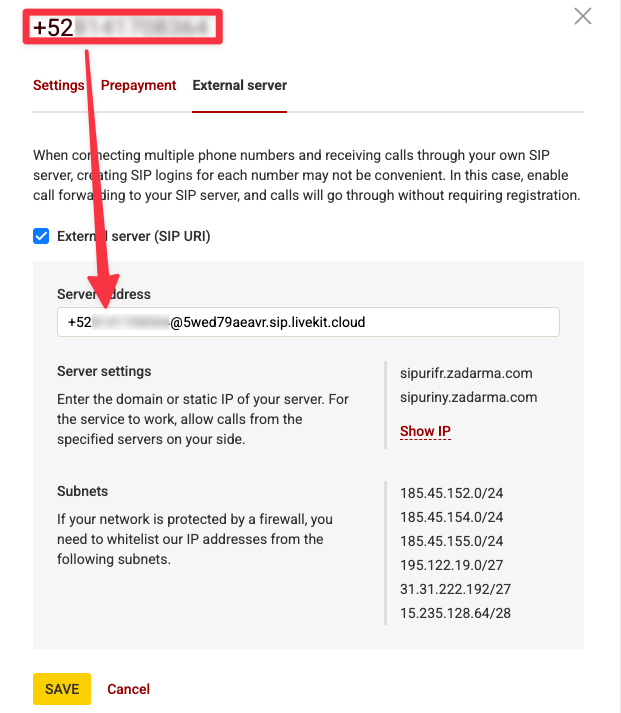
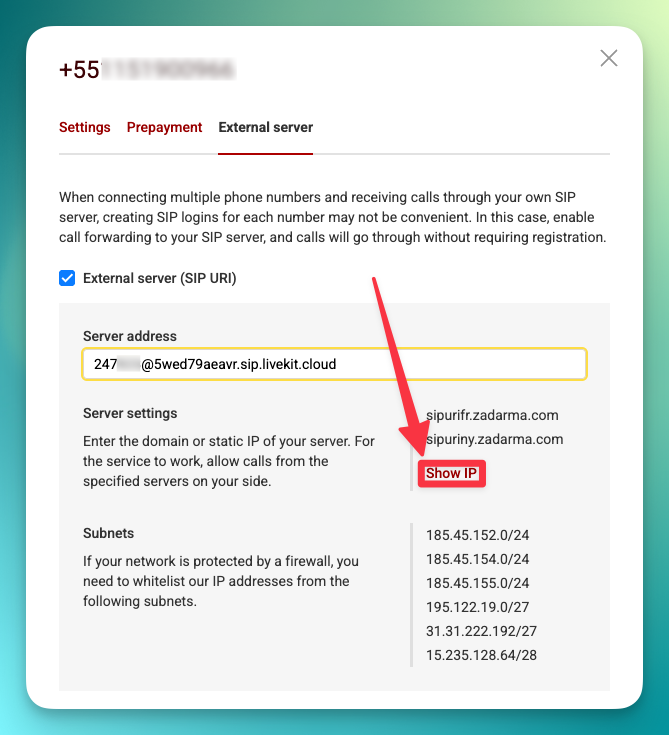
 3. Click **External Server** and enable the **SIP URI** checkbox
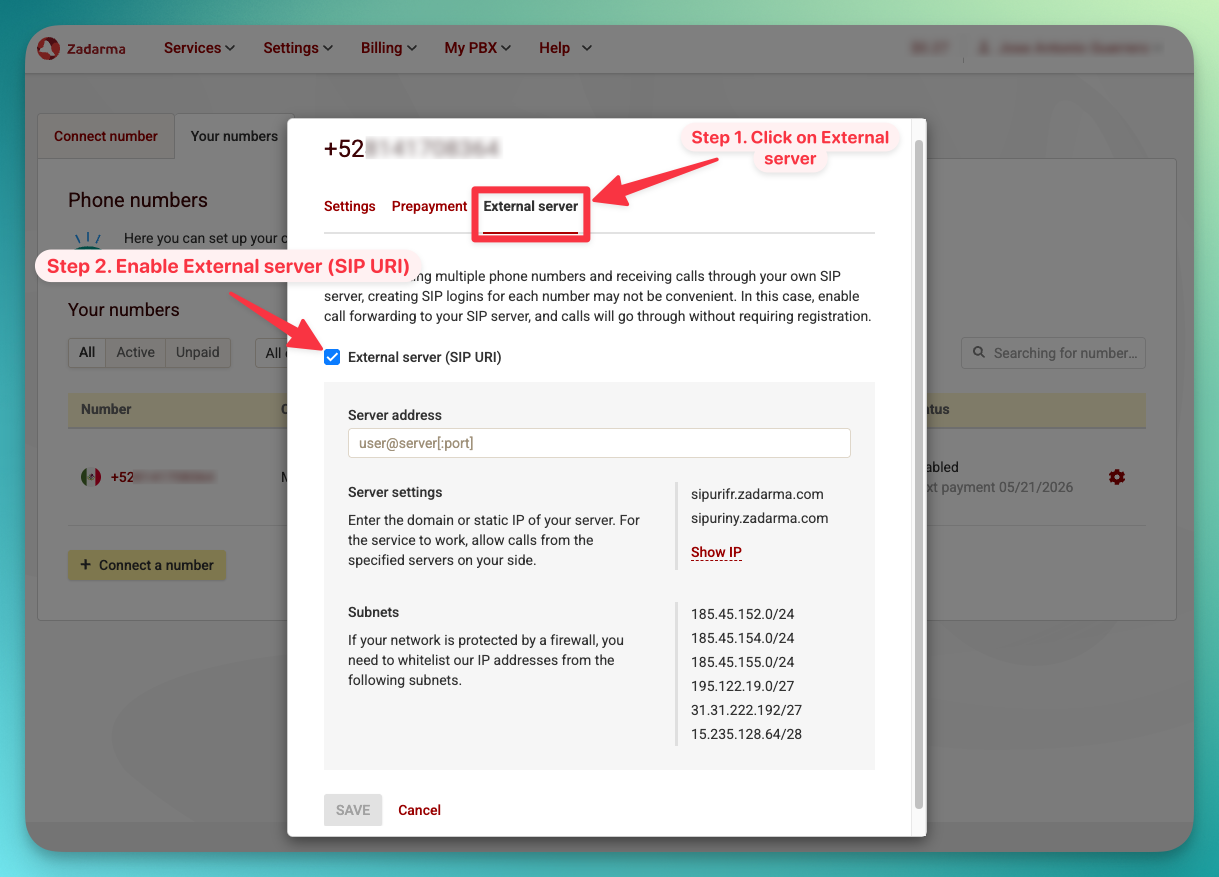 4. Enter the SIP server address using your **phone number with the `+` prefix**:
```
+YOUR_PHONE_NUMBER@5wed79aeavr.sip.livekit.cloud
```
For example, if your number is `+551151900966`:
```
+521151900966@5wed79aeavr.sip.livekit.cloud
```
4. Enter the SIP server address using your **phone number with the `+` prefix**:
```
+YOUR_PHONE_NUMBER@5wed79aeavr.sip.livekit.cloud
```
For example, if your number is `+551151900966`:
```
+521151900966@5wed79aeavr.sip.livekit.cloud
```
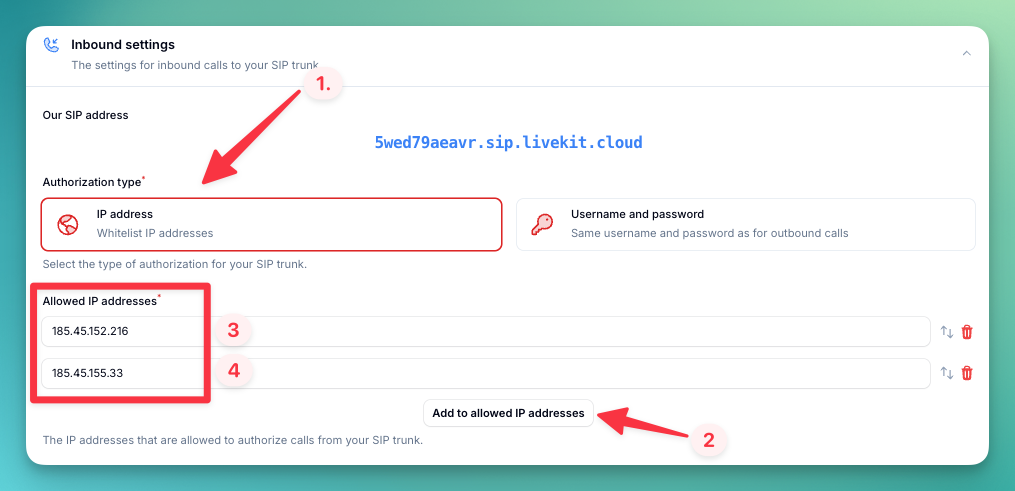
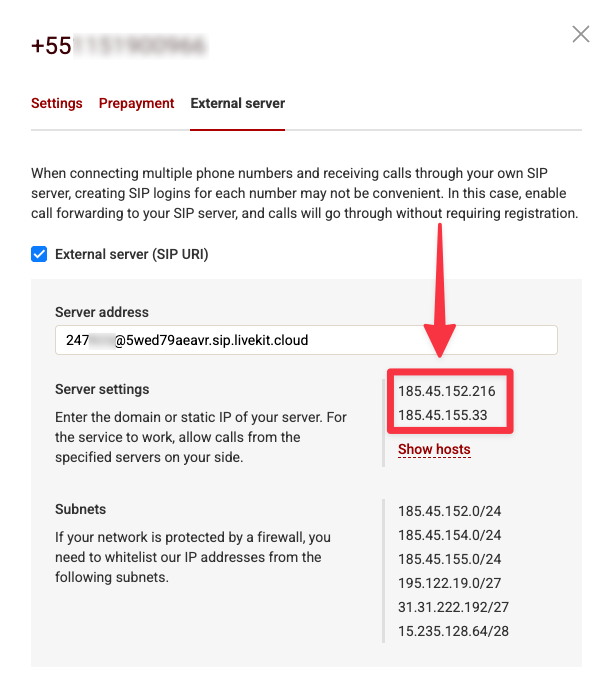
 5. Click **Show IP** below the server address to reveal Zadarma's IP addresses (e.g., `185.45.152.216`, `185.45.155.33`)
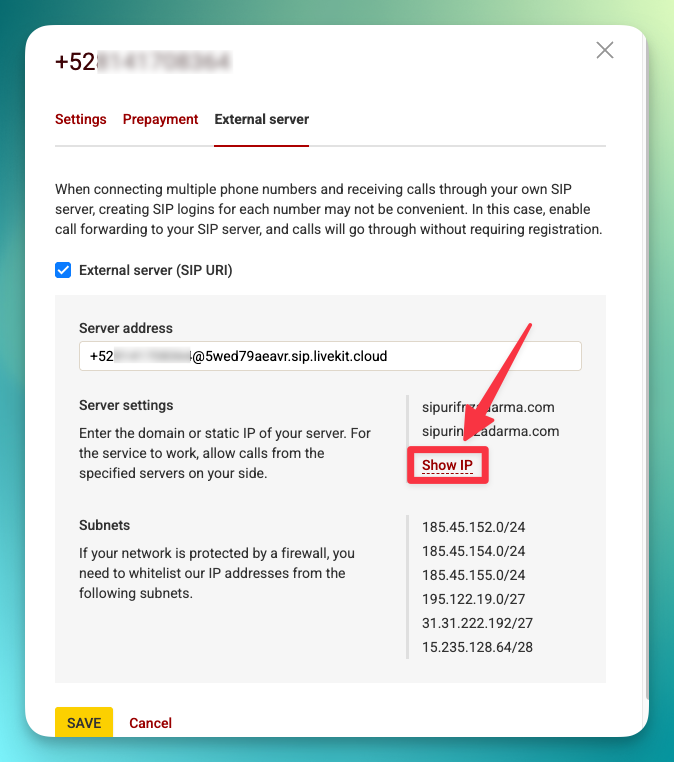
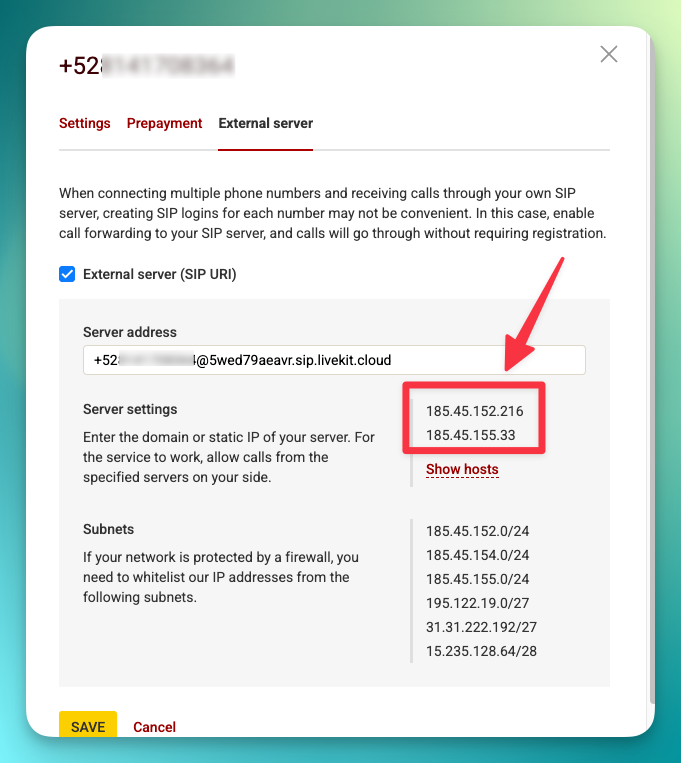 **Save these IPs** — you will need them in Step 3 when configuring inbound authorization in the platform.
**PBX users must use the phone number with `+`** in the External Server address. Using the PBX extension number (e.g., `533177-100`) will **not** work for inbound calls.
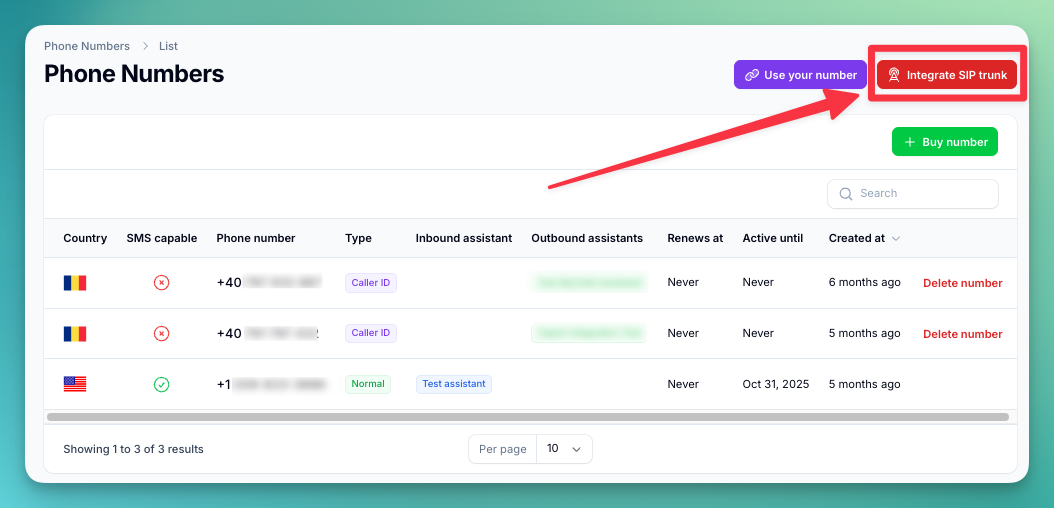
## Step 3: Import Numbers to the Platform
Now import the number so the platform knows how to route calls.
1. Go directly to the Phone Numbers page in your dashboard:
**[https://app.autocalls.ai/phone-numbers](https://app.autocalls.ai/phone-numbers)**
If it takes you to the login page, log in first — it will automatically redirect you to the Phone Numbers page.
2. Click **"Integrate SIP trunk"** (top-right corner of the page)
**Save these IPs** — you will need them in Step 3 when configuring inbound authorization in the platform.
**PBX users must use the phone number with `+`** in the External Server address. Using the PBX extension number (e.g., `533177-100`) will **not** work for inbound calls.
## Step 3: Import Numbers to the Platform
Now import the number so the platform knows how to route calls.
1. Go directly to the Phone Numbers page in your dashboard:
**[https://app.autocalls.ai/phone-numbers](https://app.autocalls.ai/phone-numbers)**
If it takes you to the login page, log in first — it will automatically redirect you to the Phone Numbers page.
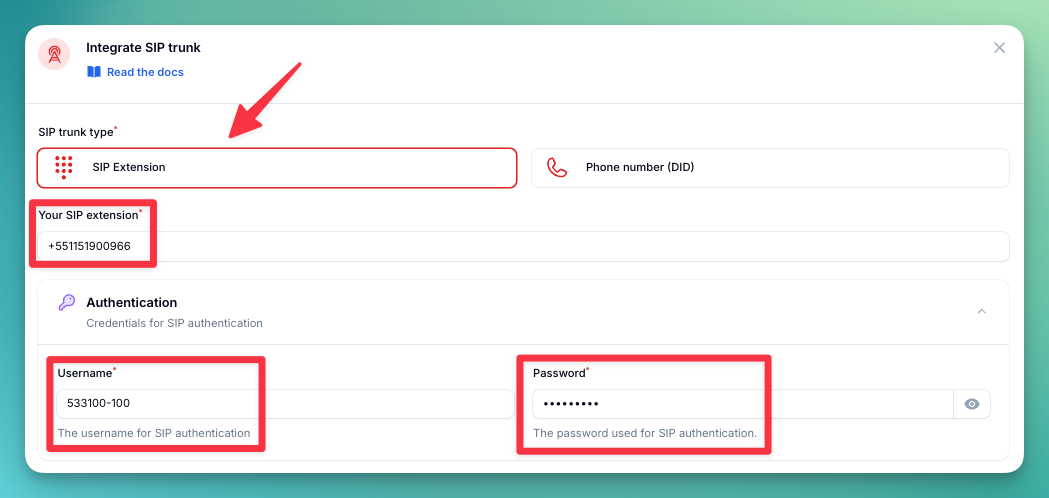
2. Click **"Integrate SIP trunk"** (top-right corner of the page)
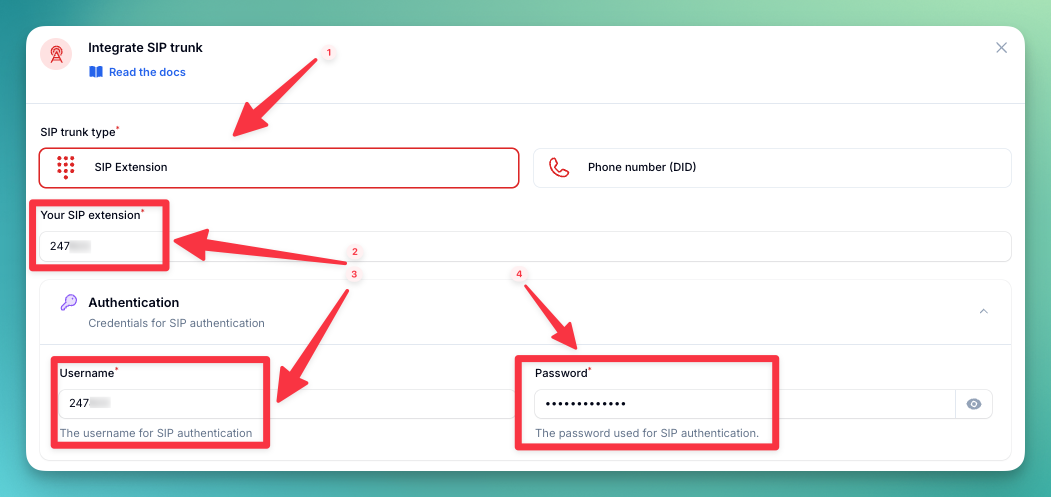
 3. Fill in your phone number and SIP credentials:
```
Phone number: e.g., +551151900966
Username: Your PBX extension (e.g., 533100-100)
Your SIP Extension: Your phone number (e.g., +551151900966)
Password: Your PBX extension password
```
**PBX users:** The **Username** is your PBX extension (e.g., `533100-100`). The **"Your SIP Extension"** field must be your **phone number** — this must match the number you used in the External Server address in Step 2.
3. Fill in your phone number and SIP credentials:
```
Phone number: e.g., +551151900966
Username: Your PBX extension (e.g., 533100-100)
Your SIP Extension: Your phone number (e.g., +551151900966)
Password: Your PBX extension password
```
**PBX users:** The **Username** is your PBX extension (e.g., `533100-100`). The **"Your SIP Extension"** field must be your **phone number** — this must match the number you used in the External Server address in Step 2.
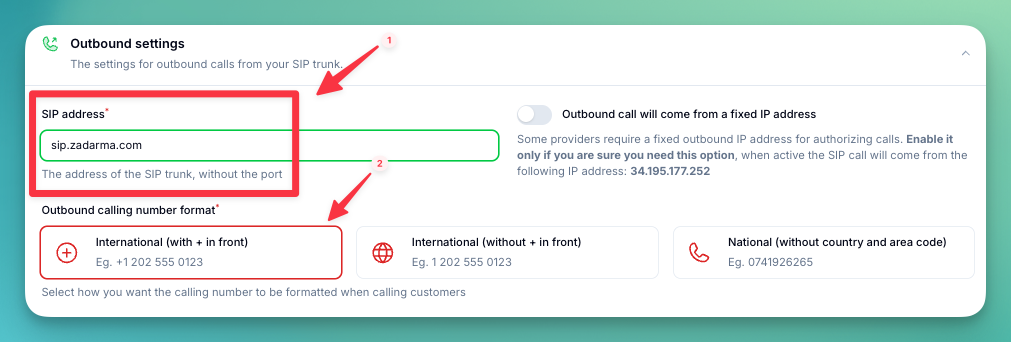
 4. Enter the **Server address** for outbound calls:
```
pbx.zadarma.com
```
4. Enter the **Server address** for outbound calls:
```
pbx.zadarma.com
```
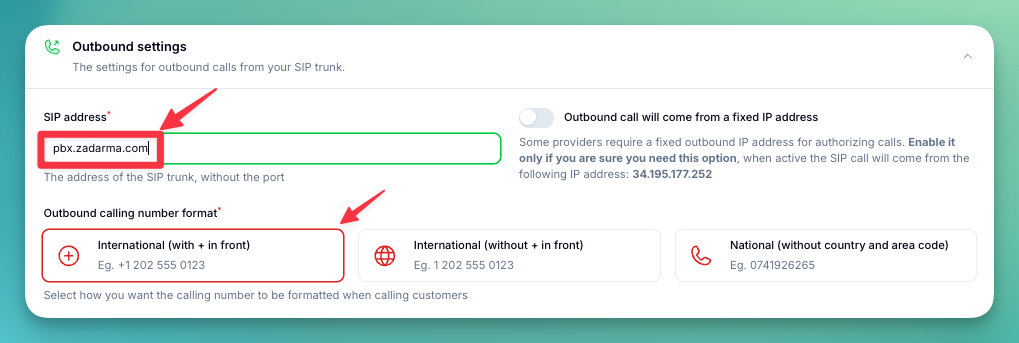 5. Select the **Authorization type**. Select **IP** and add the Zadarma IP addresses you noted earlier from **Show IP** in Step 2.
 6. Select the **country** where your SIP trunk is located.
 ## Step 4: Verify Setup
1. Make a test call to your number
2. Check that the AI assistant answers
3. Use the test call feature to verify outbound calling
## Step 1: Gather Your SIP Credentials
1. Log in to your [Zadarma Dashboard](https://my.zadarma.com)
2. Go to **Settings** → **SIP Connection**
## Step 4: Verify Setup
1. Make a test call to your number
2. Check that the AI assistant answers
3. Use the test call feature to verify outbound calling
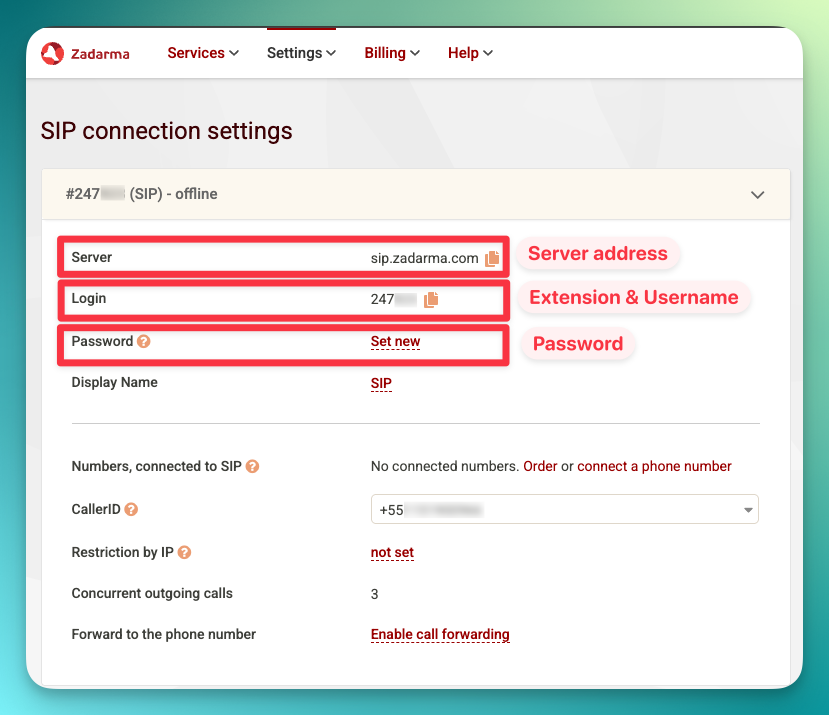
## Step 1: Gather Your SIP Credentials
1. Log in to your [Zadarma Dashboard](https://my.zadarma.com)
2. Go to **Settings** → **SIP Connection**
 3. Note these details:
```
Server address: sip.zadarma.com
Extension: Your SIP extension number (e.g., 247000)
Username: Your SIP username (the same as your extension e.g., 247000)
Password: Your SIP password
```
3. Note these details:
```
Server address: sip.zadarma.com
Extension: Your SIP extension number (e.g., 247000)
Username: Your SIP username (the same as your extension e.g., 247000)
Password: Your SIP password
```
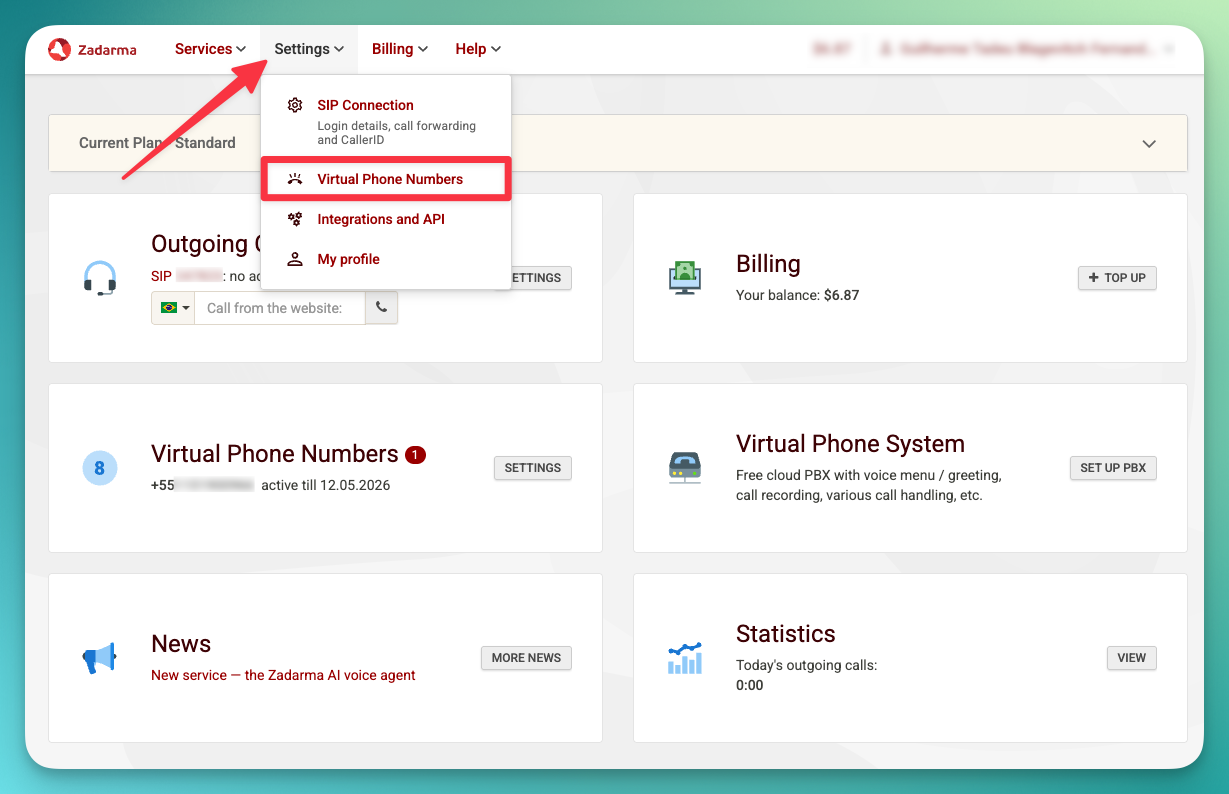
 ## Step 2: Set Up External Server (for inbound calls)
To receive inbound calls, you need to configure an **External Server** in Zadarma that forwards incoming calls to the platform's SIP server.
1. In your [Zadarma Dashboard](https://my.zadarma.com), go to **Settings** → [**Virtual phone numbers**](https://my.zadarma.com/dirnum/active/)
## Step 2: Set Up External Server (for inbound calls)
To receive inbound calls, you need to configure an **External Server** in Zadarma that forwards incoming calls to the platform's SIP server.
1. In your [Zadarma Dashboard](https://my.zadarma.com), go to **Settings** → [**Virtual phone numbers**](https://my.zadarma.com/dirnum/active/)
 2. Find the number you want to connect and click the **gear icon** to open its settings
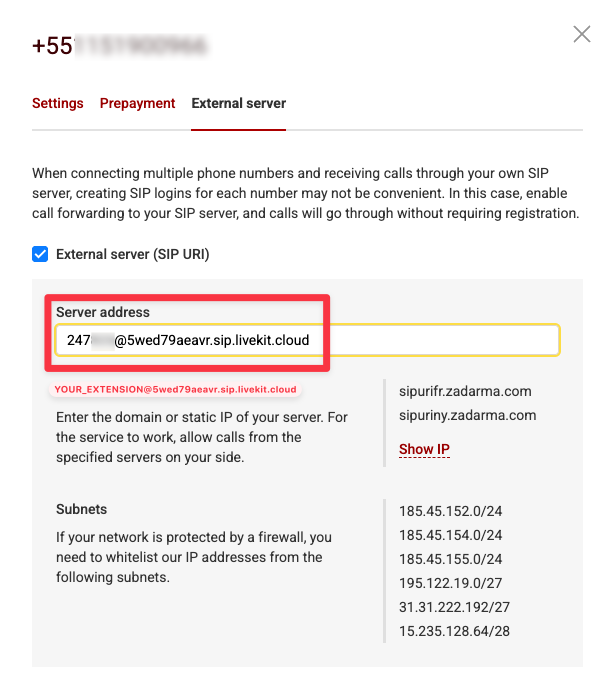
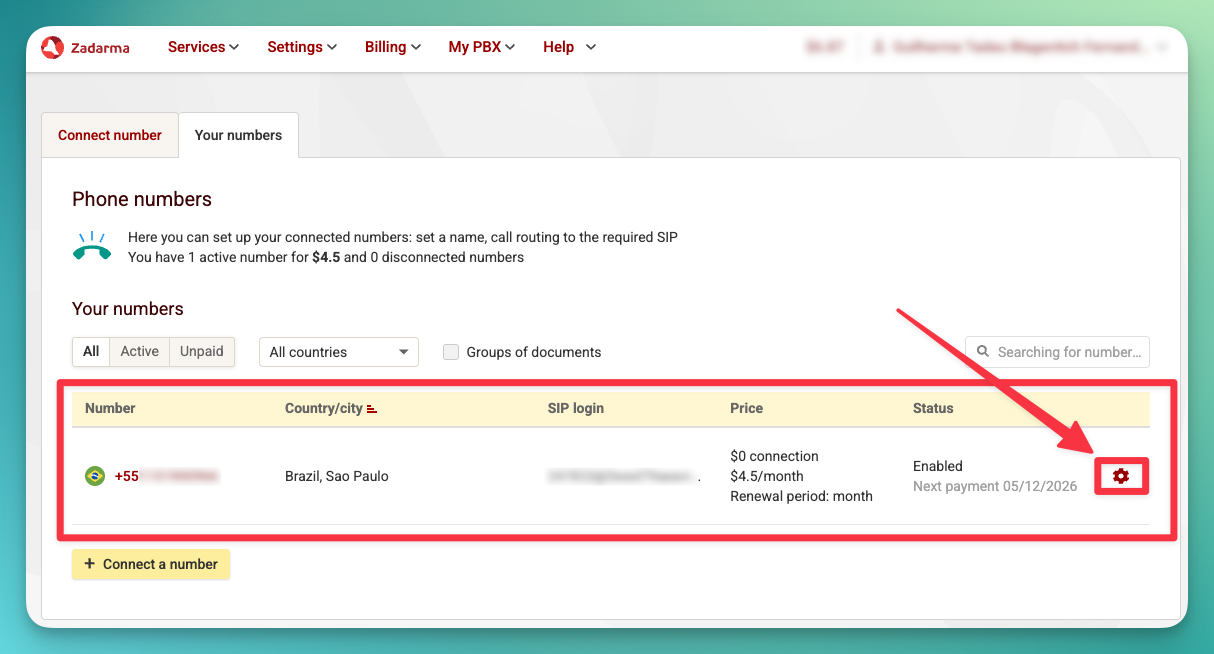 3. Click **External Server** and enable the **SIP URI** checkbox
 4. Enter the SIP server address using your **SIP extension number**:
```
YOUR_EXTENSION@5wed79aeavr.sip.livekit.cloud
```
For example, if your extension is `247000`:
```
247000@5wed79aeavr.sip.livekit.cloud
```
4. Enter the SIP server address using your **SIP extension number**:
```
YOUR_EXTENSION@5wed79aeavr.sip.livekit.cloud
```
For example, if your extension is `247000`:
```
247000@5wed79aeavr.sip.livekit.cloud
```
 5. Click **Show IP** below the server address to reveal Zadarma's IP addresses (e.g., `185.45.152.216`, `185.45.155.33`)
 **Save these IPs** — you will need them in Step 3 when configuring inbound authorization in the platform.
## Step 3: Import Numbers to the Platform
Now import the number so the platform knows how to route calls.
1. Go directly to the Phone Numbers page in your dashboard:
**[https://app.autocalls.ai/phone-numbers](https://app.autocalls.ai/phone-numbers)**
If it takes you to the login page, log in first — it will automatically redirect you to the Phone Numbers page.
2. Click **"Integrate SIP trunk"** (top-right corner of the page)
3. Fill in your phone number and SIP credentials:
```
Phone number: e.g., +1 555 0123
Your SIP Extension: Your SIP extension number (e.g., 247000)
Username: Your SIP username (the same as your extension e.g., 247000)
Password: Your SIP password
```
**Save these IPs** — you will need them in Step 3 when configuring inbound authorization in the platform.
## Step 3: Import Numbers to the Platform
Now import the number so the platform knows how to route calls.
1. Go directly to the Phone Numbers page in your dashboard:
**[https://app.autocalls.ai/phone-numbers](https://app.autocalls.ai/phone-numbers)**
If it takes you to the login page, log in first — it will automatically redirect you to the Phone Numbers page.
2. Click **"Integrate SIP trunk"** (top-right corner of the page)
3. Fill in your phone number and SIP credentials:
```
Phone number: e.g., +1 555 0123
Your SIP Extension: Your SIP extension number (e.g., 247000)
Username: Your SIP username (the same as your extension e.g., 247000)
Password: Your SIP password
```
 4. Enter the **Server address** for outbound calls:
```
sip.zadarma.com
```
4. Enter the **Server address** for outbound calls:
```
sip.zadarma.com
```
 5. Select the **Authorization type**. Select **IP** and add the Zadarma IP addresses you noted earlier from **Show IP** in Step 2.
6. Select the **country** where your SIP trunk is located.
5. Select the **Authorization type**. Select **IP** and add the Zadarma IP addresses you noted earlier from **Show IP** in Step 2.
6. Select the **country** where your SIP trunk is located.
 ## Step 4: Verify Setup
1. Make a test call to your number
2. Check that the AI assistant answers
3. Use the test call feature to verify outbound calling
## Security Requirements
Your SIP credentials need to be secure:
* **Username**: Your extension number or provider-supplied username
* **Password must have**:
* 12 or more characters
* Numbers
* Upper and lowercase letters
* Special characters recommended
## Call Transfer Limitations
**Zadarma does not support SIP REFER**, which means standard cold transfer will not work out of the box. Warm transfer works automatically — the platform handles it via SIP INVITE.
For **cold transfer**, you can use the **Custom SIP Transfer** option in your assistant's transfer settings. Set the custom SIP URI to:
```
sip:+DESTINATION_NUMBER@sip.zadarma.com
```
For example: `sip:+15557654321@sip.zadarma.com`
Make sure the number is in international E.164 format with the `+` prefix. Do **not** use `tel:` URI format.
## Common Issues
* **Check your External Server address** — make sure the format matches your connection type:
* **PBX**: `+YOUR_PHONE_NUMBER@5wed79aeavr.sip.livekit.cloud` (phone number with `+`)
* **SIP Direct**: `YOUR_EXTENSION@5wed79aeavr.sip.livekit.cloud` (extension number)
* **Verify the External Server is enabled** in Zadarma's settings
* **Check that the "Your SIP Extension" field** in the platform matches: phone number for PBX, extension for SIP Direct
* **Check the Server address** — it should be `pbx.zadarma.com` for PBX or `sip.zadarma.com` for SIP Direct
* **Verify your credentials** — make sure the username and password match what's shown in your Zadarma SIP settings
* **Check your Zadarma balance** — outbound calls require sufficient credit
Zadarma does not support SIP REFER. To enable cold transfer:
1. Go to your assistant's **Transfer Phone Call** tool settings
2. Enable **"Custom SIP transfer"** (under Advanced)
3. Set the SIP URI to `sip:+DESTINATION_NUMBER@sip.zadarma.com`
If cold transfer still fails, verify the destination number is in international format with `+`.
* **PBX** is recommended if you need multiple extensions, call routing rules, IVR menus, or other PBX features in Zadarma
* **SIP Direct** is simpler if you just need a single number connected without PBX features
Both work equally well for inbound and outbound AI calls.
***
Need help setting up? Our support team specializes in helping customers
integrate their phone systems. We'll guide you through the entire process,
ensuring a smooth setup with your specific phone system configuration.
## Step 4: Verify Setup
1. Make a test call to your number
2. Check that the AI assistant answers
3. Use the test call feature to verify outbound calling
## Security Requirements
Your SIP credentials need to be secure:
* **Username**: Your extension number or provider-supplied username
* **Password must have**:
* 12 or more characters
* Numbers
* Upper and lowercase letters
* Special characters recommended
## Call Transfer Limitations
**Zadarma does not support SIP REFER**, which means standard cold transfer will not work out of the box. Warm transfer works automatically — the platform handles it via SIP INVITE.
For **cold transfer**, you can use the **Custom SIP Transfer** option in your assistant's transfer settings. Set the custom SIP URI to:
```
sip:+DESTINATION_NUMBER@sip.zadarma.com
```
For example: `sip:+15557654321@sip.zadarma.com`
Make sure the number is in international E.164 format with the `+` prefix. Do **not** use `tel:` URI format.
## Common Issues
* **Check your External Server address** — make sure the format matches your connection type:
* **PBX**: `+YOUR_PHONE_NUMBER@5wed79aeavr.sip.livekit.cloud` (phone number with `+`)
* **SIP Direct**: `YOUR_EXTENSION@5wed79aeavr.sip.livekit.cloud` (extension number)
* **Verify the External Server is enabled** in Zadarma's settings
* **Check that the "Your SIP Extension" field** in the platform matches: phone number for PBX, extension for SIP Direct
* **Check the Server address** — it should be `pbx.zadarma.com` for PBX or `sip.zadarma.com` for SIP Direct
* **Verify your credentials** — make sure the username and password match what's shown in your Zadarma SIP settings
* **Check your Zadarma balance** — outbound calls require sufficient credit
Zadarma does not support SIP REFER. To enable cold transfer:
1. Go to your assistant's **Transfer Phone Call** tool settings
2. Enable **"Custom SIP transfer"** (under Advanced)
3. Set the SIP URI to `sip:+DESTINATION_NUMBER@sip.zadarma.com`
If cold transfer still fails, verify the destination number is in international format with `+`.
* **PBX** is recommended if you need multiple extensions, call routing rules, IVR menus, or other PBX features in Zadarma
* **SIP Direct** is simpler if you just need a single number connected without PBX features
Both work equally well for inbound and outbound AI calls.
***
Need help setting up? Our support team specializes in helping customers
integrate their phone systems. We'll guide you through the entire process,
ensuring a smooth setup with your specific phone system configuration.