> ## Documentation Index
> Fetch the complete documentation index at: https://docs.autocalls.ai/llms.txt
> Use this file to discover all available pages before exploring further.
# Flow Builder
> Design conversation flows visually with an intuitive drag-and-drop interface
Flow Builder is a visual, drag-and-drop conversation flow editor that lets you design AI assistant scripts without writing code. Create multi-step conversation flows by connecting nodes that represent different actions and decision points.
## Overview
Flow Builder provides:
* **Visual design** - Drag-and-drop nodes on a canvas
* **Multiple node types** - Messages, prompts, actions, and more
* **Branching logic** - Create different paths based on responses
* **Settings panel** - Configure agent personality and behavior
* **Import/Export** - Save and share flows as JSON files
 ## When to Use Flow Builder
* Structured conversation scripts
* Multi-path decision trees
* Complex call flows with branches
* Visual thinkers who prefer diagrams
* Simple, linear conversations
* Highly dynamic AI responses
* Quick prompt iterations
* Text-focused editing
## Getting Started
Navigate to **Assistants** and click on the assistant you want to edit.
In the edit form, scroll to the **System Prompt** section and click the **Flow Builder** tab.
Click **Launch Flow Builder**. A full-screen editor will open.
* **Continue with existing** - Edit your current flow
* **Start from scratch** - Begin with just a Start node
* **Start with template** - Load a pre-built flow template
## Interface Overview
### Canvas Area (Center)
The main workspace where you build your flow:
* **Nodes** - Drag to reposition
* **Connections** - Lines showing flow between nodes
* **Grid background** - Helps with alignment
* **Zoom controls** - Zoom in/out and fit to view
* **Pan** - Click and drag on empty space to move around
### Bottom Toolbar
Quick actions for managing your flow:
| Button | Action |
| -------------- | ---------------------------------- |
| ⚡ Auto Layout | Automatically arrange nodes neatly |
| 📋 Duplicate | Copy selected node |
| 🗑️ Delete | Remove selected node or connection |
| **+ Add Node** | Add a new node to the canvas |
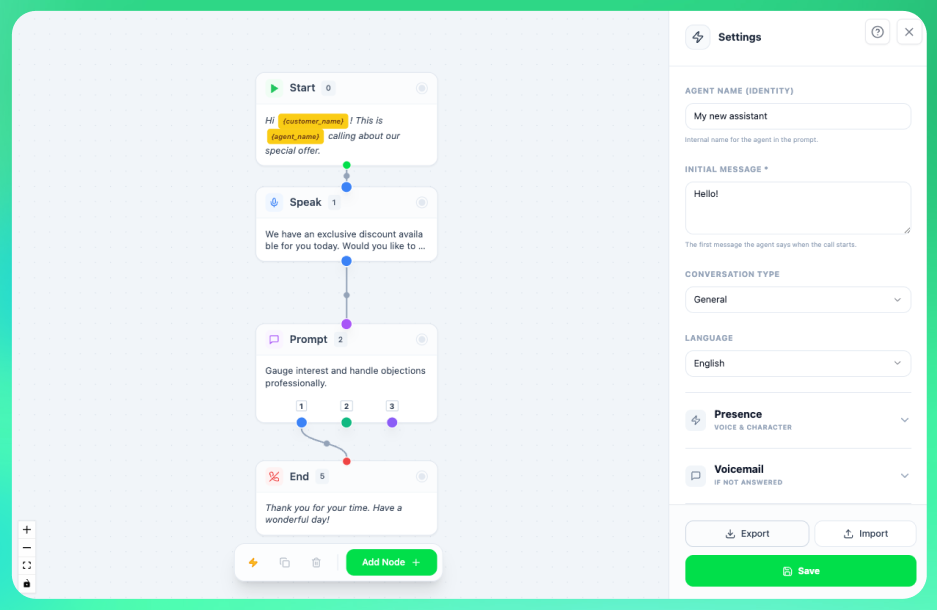
### Settings Panel (Right Side)
Configure your assistant's personality and behavior:
* **Agent Name** - The name your AI will use
* **Agent Type** - Sales, Support, Survey, etc.
* **Language** - Spoken language for calls
* **Assertiveness** - How pushy the AI should be
* **Humor** - Level of humor in responses
* **Variables** - Pre-call data fields
* **Post-Call Fields** - Data to collect after calls
## Node Types
Flow Builder has 5 node types, each with a specific purpose:
## When to Use Flow Builder
* Structured conversation scripts
* Multi-path decision trees
* Complex call flows with branches
* Visual thinkers who prefer diagrams
* Simple, linear conversations
* Highly dynamic AI responses
* Quick prompt iterations
* Text-focused editing
## Getting Started
Navigate to **Assistants** and click on the assistant you want to edit.
In the edit form, scroll to the **System Prompt** section and click the **Flow Builder** tab.
Click **Launch Flow Builder**. A full-screen editor will open.
* **Continue with existing** - Edit your current flow
* **Start from scratch** - Begin with just a Start node
* **Start with template** - Load a pre-built flow template
## Interface Overview
### Canvas Area (Center)
The main workspace where you build your flow:
* **Nodes** - Drag to reposition
* **Connections** - Lines showing flow between nodes
* **Grid background** - Helps with alignment
* **Zoom controls** - Zoom in/out and fit to view
* **Pan** - Click and drag on empty space to move around
### Bottom Toolbar
Quick actions for managing your flow:
| Button | Action |
| -------------- | ---------------------------------- |
| ⚡ Auto Layout | Automatically arrange nodes neatly |
| 📋 Duplicate | Copy selected node |
| 🗑️ Delete | Remove selected node or connection |
| **+ Add Node** | Add a new node to the canvas |
### Settings Panel (Right Side)
Configure your assistant's personality and behavior:
* **Agent Name** - The name your AI will use
* **Agent Type** - Sales, Support, Survey, etc.
* **Language** - Spoken language for calls
* **Assertiveness** - How pushy the AI should be
* **Humor** - Level of humor in responses
* **Variables** - Pre-call data fields
* **Post-Call Fields** - Data to collect after calls
## Node Types
Flow Builder has 5 node types, each with a specific purpose:
 ### Start Node (Green)
The entry point of every conversation. Every flow must have exactly one Start node.
**Properties:**
* **Greeting** - The initial message when the call begins
**Example:** "Hi, this is Sarah from Acme Insurance. How are you today?"
### Speak Node (Blue)
Delivers a pre-written message exactly as specified. Use when you need precise wording.
**Properties:**
* **Text** - The exact message to speak
* **Outcomes** - Different paths based on customer response
**Example:** "We're offering a limited-time 20% discount on all plans. Would you like to hear more?"
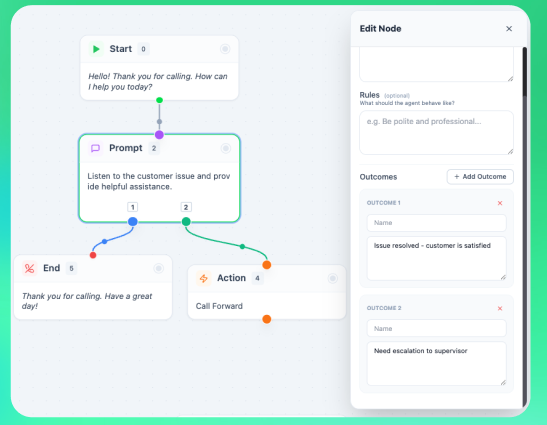
### Prompt Node (Purple)
Gives the AI instructions on how to respond. More flexible than Speak nodes - the AI generates contextual responses.
**Properties:**
* **Prompt** - Instructions for the AI
* **Outcomes** - Different paths based on response categories
**Example prompt:** "Ask the customer about their current insurance coverage. Be conversational and empathetic. Listen for mentions of their family size, budget concerns, or timeline."
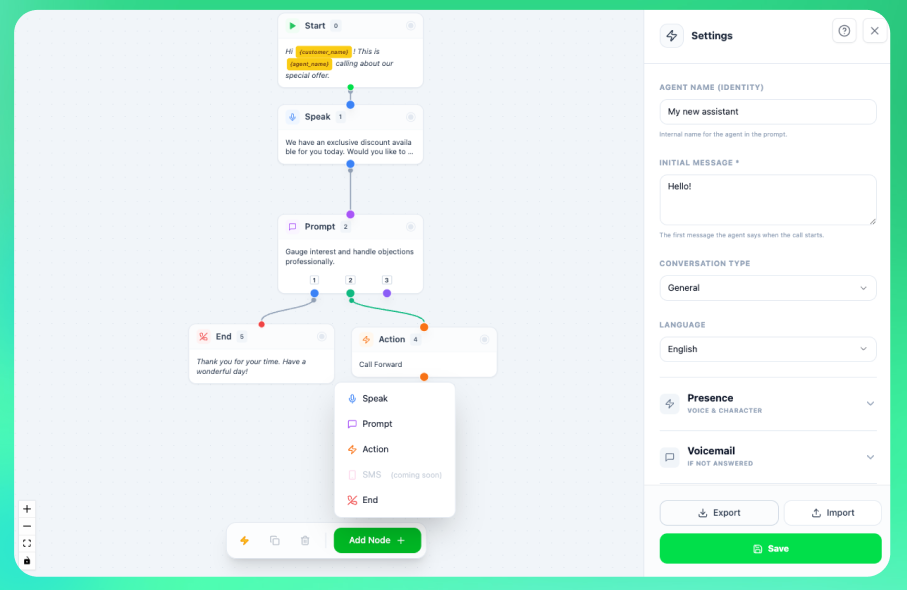
### Action Node (Orange)
Executes special actions during the call.
**Action Types:**
* **Call Forward** - Transfer to another number
* **Book Appointment** - Schedule using connected calendar
* **Custom Action** - Trigger a custom mid-call tool
**Example:** Forward to sales team at +1-555-123-4567 when customer is ready to purchase.
### End Node (Red)
Terminates the call or transfers to another destination.
**End Types:**
* **End Call** - Hang up with a closing message
* **Forward Call** - Transfer to a phone number
* **Transfer Agent** - Hand off to another assistant
**Example closing:** "Thank you for your time today. Have a great day!"
## Working with Nodes
### Adding Nodes
1. Click **+ Add Node** in the bottom toolbar
2. Select the node type from the dropdown
3. The node appears on the canvas
4. Drag it to your desired position
### Connecting Nodes
1. Hover over a node's bottom edge to see the **output handle** (small circle)
2. Click and drag from the output handle
3. Connect to another node's **input handle** (top edge)
4. Release to create the connection
### Editing Nodes
1. Click on any node to select it
2. The node's properties appear in a panel
3. Edit the text, prompt, or settings
4. Changes save automatically to the canvas
### Deleting Nodes
* Select a node and press **Delete** key, or
* Select a node and click the 🗑️ button in the toolbar
The Start node cannot be deleted. Every flow must have one Start node.
## Outcomes (Multiple Paths)
Speak and Prompt nodes can have multiple **outcomes** - different paths based on how the customer responds.
### Adding Outcomes
1. Select a Speak or Prompt node
2. In the properties panel, find **Outcomes**
3. Click **Add Outcome**
4. Name the outcome (e.g., "Interested", "Not interested", "Wants callback")
### Connecting Outcomes
Each outcome appears as a colored dot at the bottom of the node. Connect each outcome to a different destination node to create branching logic.
### Start Node (Green)
The entry point of every conversation. Every flow must have exactly one Start node.
**Properties:**
* **Greeting** - The initial message when the call begins
**Example:** "Hi, this is Sarah from Acme Insurance. How are you today?"
### Speak Node (Blue)
Delivers a pre-written message exactly as specified. Use when you need precise wording.
**Properties:**
* **Text** - The exact message to speak
* **Outcomes** - Different paths based on customer response
**Example:** "We're offering a limited-time 20% discount on all plans. Would you like to hear more?"
### Prompt Node (Purple)
Gives the AI instructions on how to respond. More flexible than Speak nodes - the AI generates contextual responses.
**Properties:**
* **Prompt** - Instructions for the AI
* **Outcomes** - Different paths based on response categories
**Example prompt:** "Ask the customer about their current insurance coverage. Be conversational and empathetic. Listen for mentions of their family size, budget concerns, or timeline."
### Action Node (Orange)
Executes special actions during the call.
**Action Types:**
* **Call Forward** - Transfer to another number
* **Book Appointment** - Schedule using connected calendar
* **Custom Action** - Trigger a custom mid-call tool
**Example:** Forward to sales team at +1-555-123-4567 when customer is ready to purchase.
### End Node (Red)
Terminates the call or transfers to another destination.
**End Types:**
* **End Call** - Hang up with a closing message
* **Forward Call** - Transfer to a phone number
* **Transfer Agent** - Hand off to another assistant
**Example closing:** "Thank you for your time today. Have a great day!"
## Working with Nodes
### Adding Nodes
1. Click **+ Add Node** in the bottom toolbar
2. Select the node type from the dropdown
3. The node appears on the canvas
4. Drag it to your desired position
### Connecting Nodes
1. Hover over a node's bottom edge to see the **output handle** (small circle)
2. Click and drag from the output handle
3. Connect to another node's **input handle** (top edge)
4. Release to create the connection
### Editing Nodes
1. Click on any node to select it
2. The node's properties appear in a panel
3. Edit the text, prompt, or settings
4. Changes save automatically to the canvas
### Deleting Nodes
* Select a node and press **Delete** key, or
* Select a node and click the 🗑️ button in the toolbar
The Start node cannot be deleted. Every flow must have one Start node.
## Outcomes (Multiple Paths)
Speak and Prompt nodes can have multiple **outcomes** - different paths based on how the customer responds.
### Adding Outcomes
1. Select a Speak or Prompt node
2. In the properties panel, find **Outcomes**
3. Click **Add Outcome**
4. Name the outcome (e.g., "Interested", "Not interested", "Wants callback")
### Connecting Outcomes
Each outcome appears as a colored dot at the bottom of the node. Connect each outcome to a different destination node to create branching logic.
 **Example flow:**
```
[Start] → [Ask about interest]
↓
[Prompt: "Ask if interested"]
↓
┌─────────┼─────────┐
↓ ↓ ↓
[Interested] [Maybe] [Not Interested]
↓ ↓ ↓
[Book Demo] [Send Info] [Thank & End]
```
## Settings Panel
**Example flow:**
```
[Start] → [Ask about interest]
↓
[Prompt: "Ask if interested"]
↓
┌─────────┼─────────┐
↓ ↓ ↓
[Interested] [Maybe] [Not Interested]
↓ ↓ ↓
[Book Demo] [Send Info] [Thank & End]
```
## Settings Panel
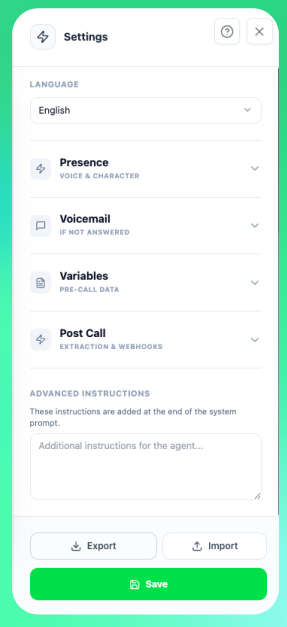 ### Agent Identity
| Setting | Description |
| -------------- | ------------------------------------------------ |
| **Agent Name** | Name the AI uses to introduce itself |
| **Agent Type** | Preset personality: Sales, Support, Survey, etc. |
| **Language** | Primary language for the conversation |
### Personality
| Setting | Options | Description |
| ----------------- | ------------------------- | --------------------------- |
| **Assertiveness** | Low / Medium / High | How persistent the AI is |
| **Humor** | Off / Low / Medium / High | Level of humor in responses |
### Variables
Add pre-call data that can be used in your messages:
1. Click **Add Variable**
2. Enter a **Name** (e.g., `product_interest`)
3. Set a **Default Value**
Use variables in messages with curly braces: `{variable_name}`
**Example:** "Hi {customer_name}, I see you were interested in our {product_interest}."
### Post-Call Fields
Define data to extract from calls:
1. Click **Add Field**
2. Enter **Name**, **Type**, and **Description**
3. The AI will attempt to fill these based on the conversation
**Types:** `string`, `number`, `boolean`
## Import/Export
### Export Your Flow
1. Open the Settings panel
2. Scroll to the bottom
3. Click **Export JSON**
4. Save the `.json` file
### Import a Flow
1. Click **Import JSON** in settings
2. Select your `.json` file
3. The flow loads on the canvas
Export your flows regularly as backups. You can also share flows with team members this way.
## Voicemail Settings
Configure what happens when voicemail is detected:
* **Voicemail Message** - Message to leave if voicemail answers
* **End Call on Voicemail** - Toggle to automatically hang up on voicemail
## Saving Your Flow
Click the **Save** button in the top-right corner to save your flow to the assistant.
The flow is stored as JSON in your assistant's system prompt field. If you switch to the Classic Editor, you'll see the raw JSON data.
## Best Practices
Begin with a basic flow and add complexity gradually. Test at each step.
Prompt nodes give the AI flexibility. Use them for dynamic, context-aware responses.
Before building, sketch the main paths: positive, negative, and neutral responses.
Make test calls covering all paths. Verify each outcome leads to the right destination.
## Troubleshooting
* Ensure you're dragging from an **output handle** (bottom) to an **input handle** (top)
* Check that you're not creating a circular connection
* The Start node only has an output, End node only has an input
* Check your internet connection
* Ensure you have at least one node (besides Start)
* Look for any validation errors in the settings panel
* Use Speak nodes for exact wording requirements
* Make Prompt node instructions more specific
* Check that outcomes are clearly defined and connected
## Related Resources
* [AI Prompt Editor](/ai-assistants/ai-prompt-editor) - Chat-based alternative for prompt editing
* [System Prompts Guide](/ai-assistants/system-prompt) - Understanding prompt fundamentals
* [Testing Your Assistant](/ai-assistants/testing) - How to test your flows
### Agent Identity
| Setting | Description |
| -------------- | ------------------------------------------------ |
| **Agent Name** | Name the AI uses to introduce itself |
| **Agent Type** | Preset personality: Sales, Support, Survey, etc. |
| **Language** | Primary language for the conversation |
### Personality
| Setting | Options | Description |
| ----------------- | ------------------------- | --------------------------- |
| **Assertiveness** | Low / Medium / High | How persistent the AI is |
| **Humor** | Off / Low / Medium / High | Level of humor in responses |
### Variables
Add pre-call data that can be used in your messages:
1. Click **Add Variable**
2. Enter a **Name** (e.g., `product_interest`)
3. Set a **Default Value**
Use variables in messages with curly braces: `{variable_name}`
**Example:** "Hi {customer_name}, I see you were interested in our {product_interest}."
### Post-Call Fields
Define data to extract from calls:
1. Click **Add Field**
2. Enter **Name**, **Type**, and **Description**
3. The AI will attempt to fill these based on the conversation
**Types:** `string`, `number`, `boolean`
## Import/Export
### Export Your Flow
1. Open the Settings panel
2. Scroll to the bottom
3. Click **Export JSON**
4. Save the `.json` file
### Import a Flow
1. Click **Import JSON** in settings
2. Select your `.json` file
3. The flow loads on the canvas
Export your flows regularly as backups. You can also share flows with team members this way.
## Voicemail Settings
Configure what happens when voicemail is detected:
* **Voicemail Message** - Message to leave if voicemail answers
* **End Call on Voicemail** - Toggle to automatically hang up on voicemail
## Saving Your Flow
Click the **Save** button in the top-right corner to save your flow to the assistant.
The flow is stored as JSON in your assistant's system prompt field. If you switch to the Classic Editor, you'll see the raw JSON data.
## Best Practices
Begin with a basic flow and add complexity gradually. Test at each step.
Prompt nodes give the AI flexibility. Use them for dynamic, context-aware responses.
Before building, sketch the main paths: positive, negative, and neutral responses.
Make test calls covering all paths. Verify each outcome leads to the right destination.
## Troubleshooting
* Ensure you're dragging from an **output handle** (bottom) to an **input handle** (top)
* Check that you're not creating a circular connection
* The Start node only has an output, End node only has an input
* Check your internet connection
* Ensure you have at least one node (besides Start)
* Look for any validation errors in the settings panel
* Use Speak nodes for exact wording requirements
* Make Prompt node instructions more specific
* Check that outcomes are clearly defined and connected
## Related Resources
* [AI Prompt Editor](/ai-assistants/ai-prompt-editor) - Chat-based alternative for prompt editing
* [System Prompts Guide](/ai-assistants/system-prompt) - Understanding prompt fundamentals
* [Testing Your Assistant](/ai-assistants/testing) - How to test your flows